We know why we’re migrating to Swift 6, and we have the habits to do so efficiently. Now it’s time to dive into the actual steps needed to perform a step-by-step migration to Swift 6 and strict concurrency checking.
While I guide you through a sequence of steps, you’re more than welcome to change the order and go back and forth. The primary goal is to demonstrate the incremental steps available for existing projects to migrate progressively. With that in mind, let’s dive into the details!
1. Find an isolated piece of code
The first step is to determine which part of your project you will migrate. You can’t simply migrate all at once, so you have to start somewhere.
It’s best to identify a standalone piece of code. Ideally, even code within an isolated package. The fewer dependencies you have, the less risk of running into a concurrency rabbit hole. If you’re updating a piece of code that’s used throughout your project, you’ll likely need to update all instances simultaneously. This becomes challenging and likely results in a harder-to-manage migration step.
When I performed the migration at WeTransfer, I examined packages that had no dependencies. These were great to start with, as they allowed me to get into the habit of migrating without encountering too many dependencies that would begin to throw warnings and errors. After finding that isolated package or project, I would find an isolated Swift file and start there. Step by step, I migrated everything inside that package following the steps described in this lesson.
Of course, eventually you’ll have to migrate all projects and packages. However, a top-level package becomes easier to migrate if all its dependencies have been migrated.
Note
In other words, the steps in this lesson can be applied multiple times. For each package or project, you’ll run through the steps described in this lesson.
2. Update related dependencies
By updating related dependencies, I primarily mean third-party dependencies. For example, I’d like to highlight RocketSim‘s backend, which is written using Swift on the Server and a popular framework called Vapor.
When I started migrating this project, I first updated to the latest version of Vapor. It required me to rewrite endpoints using new protocol requirements since Vapor was more up to date for Swift Concurrency than the last time I updated the package.
I could now perform these changes in isolation before having to deal with strict concurrency checking or Swift 6 language mode. The resulting changes also made it easier for me to take the final step towards migrating all the Swift code on the Server for the Swift Concurrency migration.
In other words, identify which third-party packages are used by the isolated code and check for any available updates. Apply these updates and submit a pull request specifically for these related changes. Once completed, move on to the next step.
3. Add async alternatives
Now that we’ve updated the third party dependencies in an isolated piece of code, we’re ready to slowly migrate to strict concurrency checking. As soon as we change build settings for this migration, we will run into all kinds of warnings and errors. An in-between step is to add async alternatives to existing code and take that as a final step for this piece of code.
Yes, you’re reading that right—this could be a final step in your current migration. You might have a networking package or some kind of commonly used extensions. Prepare those for Swift Concurrency by simply providing async/await alternatives and you allow your colleagues to already start using Swift Concurrency. It could also be that one of your colleagues focuses on migrating a package that depends on this isolated piece of code. By having that async alternative in place, they can continue and prevent extra tech debt. Meanwhile, you can focus on implementing an actual Swift Concurrency alternative behind the scenes.
A typical way of providing these alternatives is by making use of Xcode’s refactoring options:
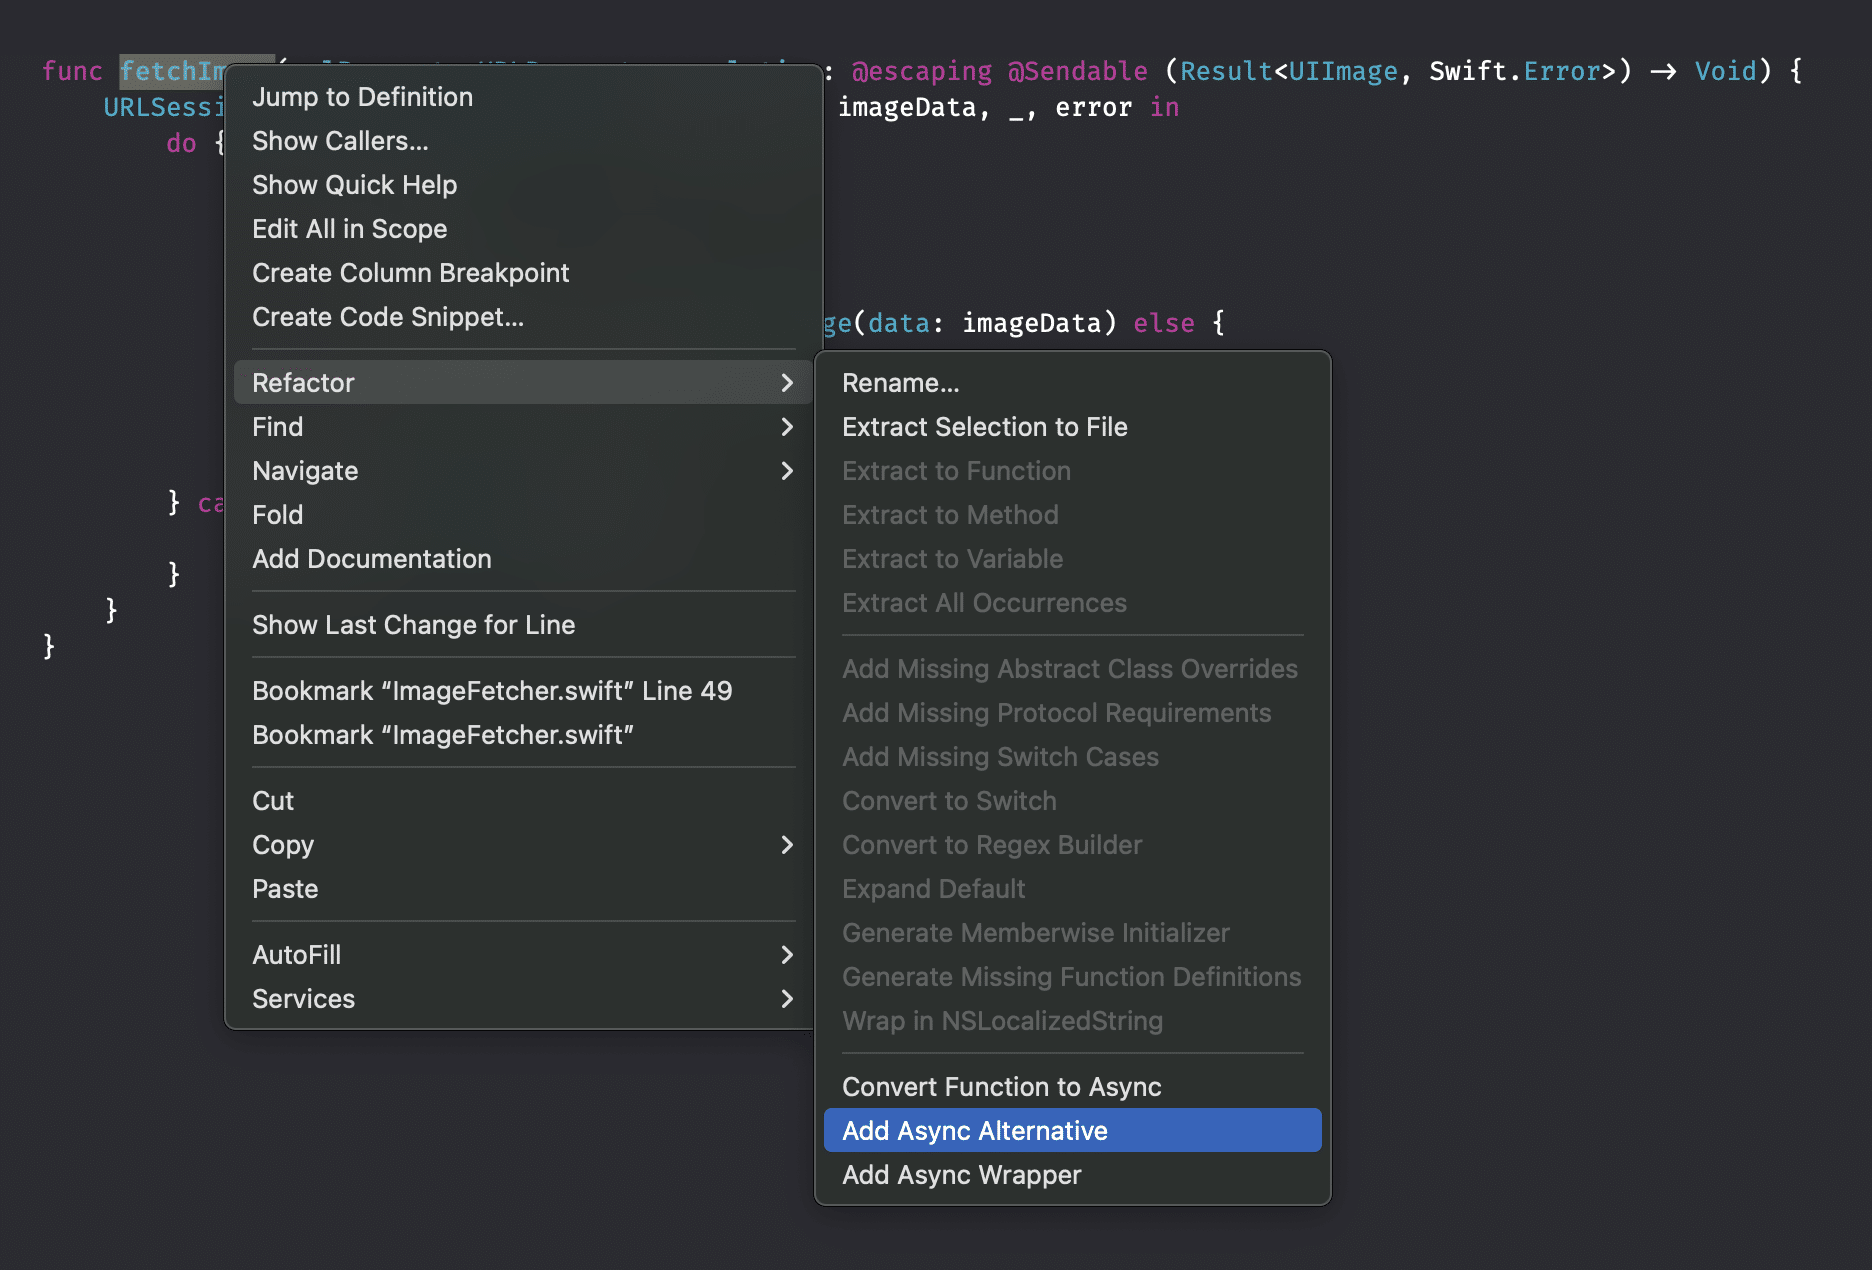
If you choose Add Async Wrapper, it will automatically migrate a method like:
func fetchImage(urlRequest: URLRequest, completion: @escaping @Sendable (Result<UIImage, Swift.Error>) -> Void) {
    URLSession.shared.dataTask(with: urlRequest) { imageData, _, error in
        do {
            if let error {
                throw error
            }

            guard let imageData, let image = UIImage(data: imageData) else {
                throw Error.imageConversionFailed
            }

            completion(.success(image))
        } catch {
            completion(.failure(error))
        }
    }
}
To something like:
@available(*, renamed: "fetchImage(urlRequest:)")
func fetchImage(urlRequest: URLRequest, completion: @escaping @Sendable (Result<UIImage, Swift.Error>) -> Void) {
    URLSession.shared.dataTask(with: urlRequest) { imageData, _, error in
        do {
            if let error {
                throw error
            }

            guard let imageData, let image = UIImage(data: imageData) else {
                throw Error.imageConversionFailed
            }

            completion(.success(image))
        } catch {
            completion(.failure(error))
        }
    }
}

func fetchImage(urlRequest: URLRequest) async throws -> UIImage {
    return try await withCheckedThrowingContinuation { continuation in
        fetchImage(urlRequest: urlRequest) { result in
            continuation.resume(with: result)
        }
    }
}
In this case, it adds the following available attribute:
@available(*, renamed: "fetchImage(urlRequest:)")
Which will likely not trigger any warnings since it’s not marked as deprecated or unavailable. Instead, I recommend updating this to:
@available(*, deprecated, renamed: "fetchImage(urlRequest:)", message: "Consider using the async/await alternative.")
Which will show you warnings in places where the code is used:

This could be a great starting point for progressive migration towards Swift Concurrency without having to deal with Strict Concurrency checking just yet. In other words, consider addressing all deprecation warnings throughout the project before proceeding with the following steps.
Note
We will dive deeper into these refactoring options in a dedicated lesson later in this module.
4. Change the Default Actor Isolation
Swift 6.2 introduced a new feature called Default Actor Isolation, which we covered in the threading module. It allows you to change the default isolation from nonisolated to @MainActor isolation. This change can drastically impact the number of changes you have to apply to app projects. Assuming the majority of you develop apps, I recommend changing this setting to MainActor before you continue:
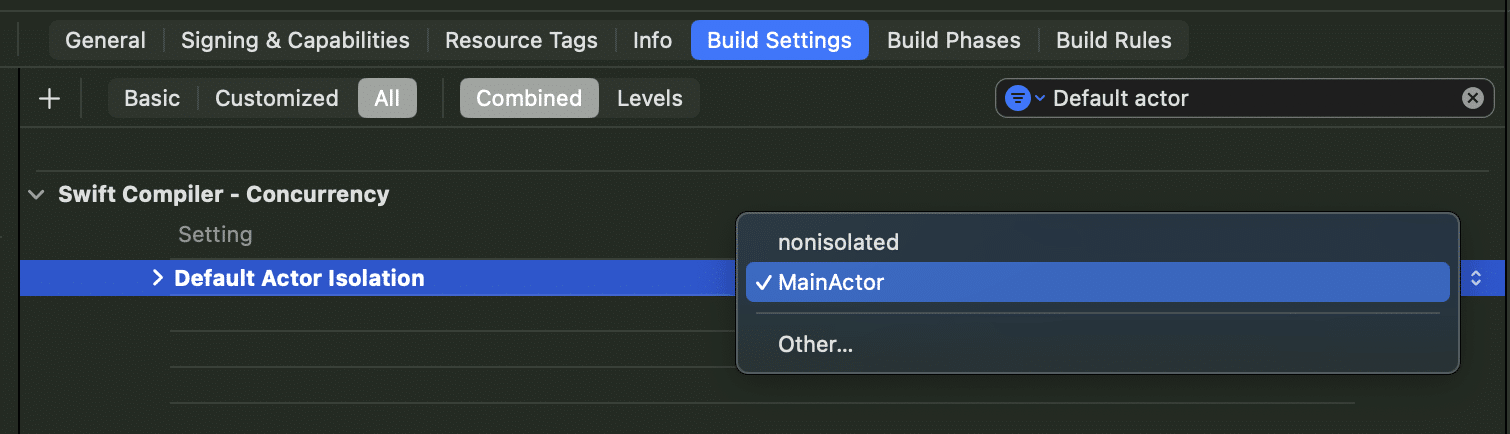
You can do the same for packages:
.target(
    name: "DefaultActorIsolationPackage",
    swiftSettings: [
        /// You can add a new `defaultIsolation` Swift setting to any of your SPM targets.
        .defaultIsolation(MainActor.self)
    ]
)
Build your project after enabling and resolving any warnings or errors you encounter, then continue. Refer back to the dedicated lesson, “Controlling the default isolation domain (Updated for Swift 6.2),” to refresh your memory about the details of this feature.
5. Enable Strict Concurrency Checking
Once you’re ready for the next step, it’s time to enable strict concurrency checking. You can do so by going into Xcode’s build settings:

It’s likely set to Minimal for your existing projects, and you can change it to Targeted or Complete accordingly.
The three levels are best described as follows:
- Minimal: Enforces Sendable and actor-isolation checks only where concurrency has been explicitly adopted (e.g., via
@Sendable,@MainActor). Ideal for starting migration without overwhelming warnings. - Targeted: Enforces
Sendableand actor-isolation checks in all code that explicitly adopts concurrency, including any type that conforms toSendable. Suitable for incremental adoption in parts of the codebase. - Complete: Applies
Sendableenforcement and actor-isolation checks across the entire codebase, regardless of explicit concurrency annotations. Matches Swift 6’s default behavior for maximum safety.
In other words, it allows you to migrate to the Swift 6 language mode gradually. You can enable each of this level for Swift packages as follows:
.target(
    name: "CoreExtensions",
    dependencies: ["Logging"],
    path: "CoreExtensions/Sources",
    swiftSettings: [
        /// Used to be like this in Xcode 14:
        SwiftSetting.unsafeFlags(["-Xfrontend", "-strict-concurrency=complete"]),

        /// Xcode 15, 16, 26, and up. Remove `=targeted` to use the default `complete`. Potentially isolate to a platform to further reduce scope.
        .enableExperimentalFeature("StrictConcurrency=targeted", .when(platforms: [.macOS]))
    ]
)
Fix all the warnings and errors
Of course, just changing the level is not enough. For each change in level, you’ll likely see new warnings and errors. Solve these before you continue to the next level or step in this migration flow. These are also perfect checkpoint for opening up a pull request with focused changes.
6. Add Sendable conformances
I would say this step is optional, but for some packages, it makes sense to add Sendable conformance to types, even though the compiler hasn’t complained about them yet. You might have enabled strict concurrency checking without any warnings remaining. However, if your package is used a lot throughout the main project, you’ll benefit from adding Sendable conformance before leaving the package untouched. This prepares the code for future adoption in places where these types will cross isolation domains.
7. Enable Approachable Concurrency
This has been a chicken-egg story: which lesson and which step comes first? I decided to first give you the steps for migrating before sharing details on some of the migration steps. The same counts for this one—you’ll find all the details about enabling the Approachable Concurrency build setting in the next lesson.
Approachable Concurrency is a build setting in Xcode that enables several upcoming features aimed at making concurrency more approachable. You should not just enable this build setting for existing projects, as you want to use the migration tooling to migrate to each upcoming feature individually. There’s a dedicated lesson on feature migration in this module.
8. Enable upcoming features
While this step is optional too, it’s important to understand that upcoming features will eventually make it into the core language. I’m a big fan of fixing stuff while in the context since it makes it easier to apply changes. You’re now deep into the migration of a specific project, so you might as well go one step further and adopt upcoming features too. The context awareness makes it easier to migrate the code while you’re at it.
Note
Before you start manual migration, I encourage you to have a look at one of the future lessons regarding Swift migration tools. It’s a dedicated lesson that I did not want to squeeze in here and it demonstrates how you can use a Swift migration tool to automatically migrate your code.
Upcoming features can be enabled from Xcode’s build settings:
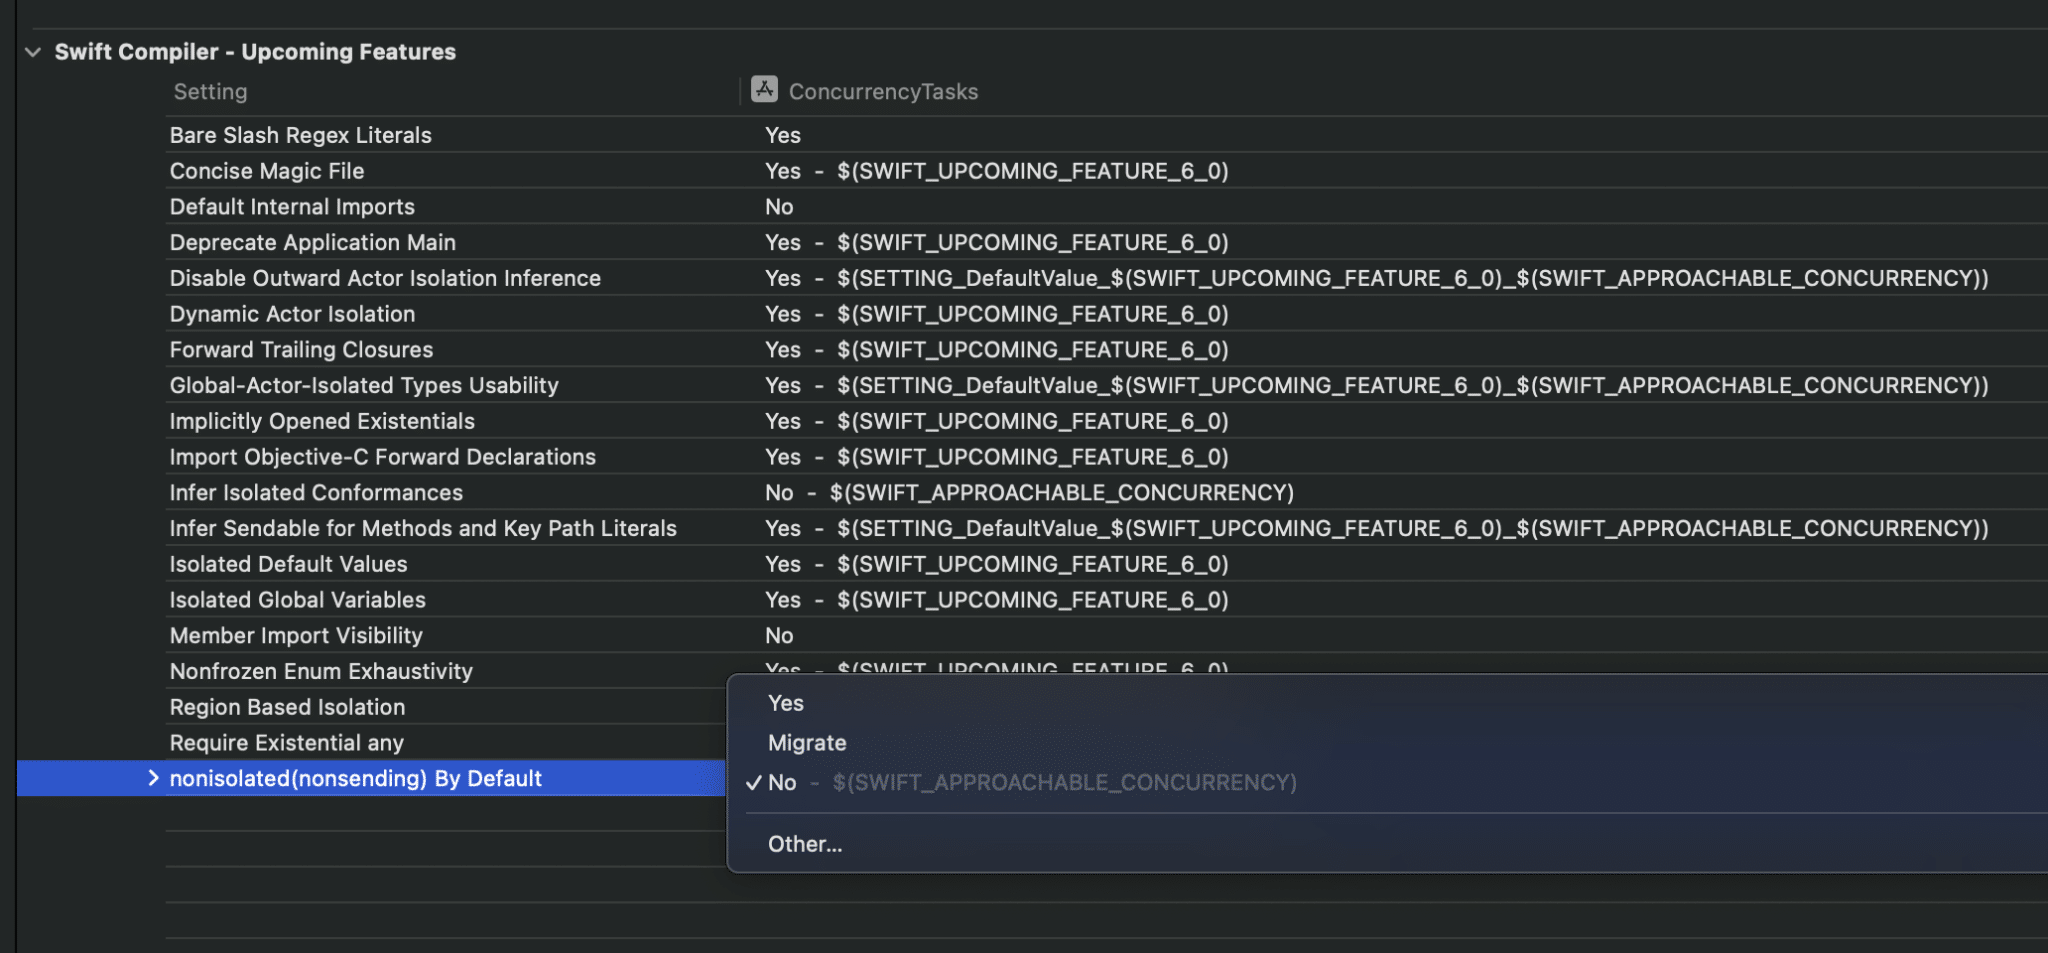
Dependining on how old your project is, you’ll notice a few of them are already turned on. Note that you can see the Migrate option here too, which allows you to make use of Swift’s migration tooling. Like noted before, more about that later!
For Swift packages, you can enable upcoming features as follows:
.target(
    name: "MyTarget",
    swiftSettings: [
        .enableUpcomingFeature("ConciseMagicFile"),
        .enableUpcomingFeature("BareSlashRegexLiterals"),
        .enableUpcomingFeature("ExistentialAny")
    ])
You can find keys for an upcoming feature inside Swift Evolution proposals. For example, the ExistentialAny key can be found in this proposal:
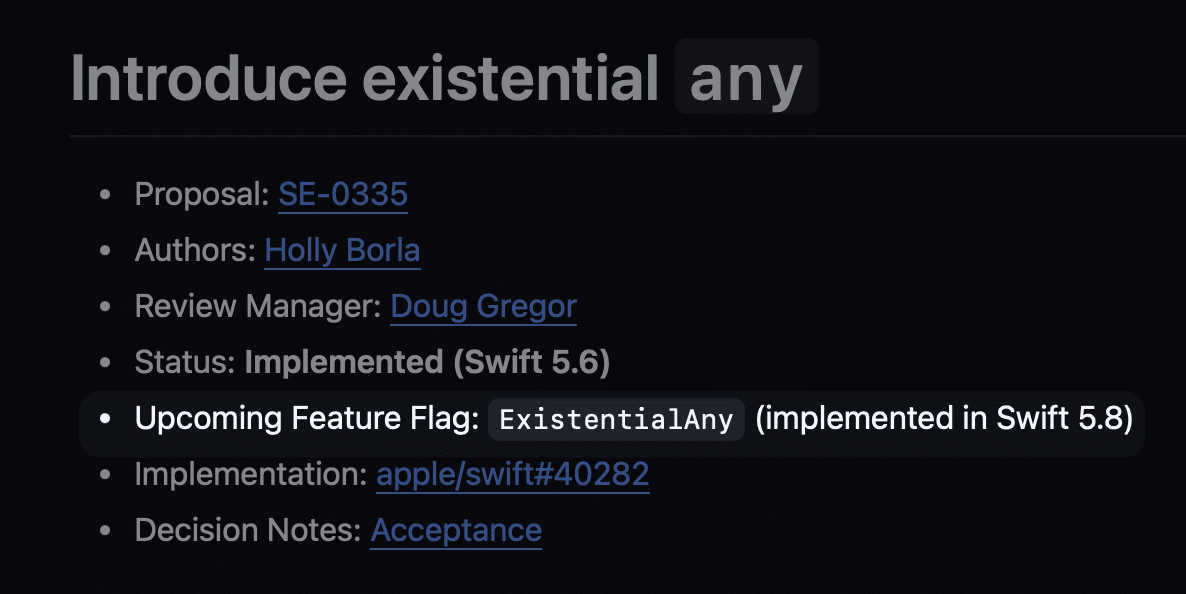
The Swift version behind the status is important too and should match your package’s version at the top:
// swift-tools-version: 5.9
// The swift-tools-version declares the minimum version of Swift required to build this package.

import PackageDescription

let package = Package(
In the above example, we’re using Swift 5.9, which is higher than the required Swift 5.6 for ExistentialAny.
You can also stay within Xcode’s build settings to find the proper key:
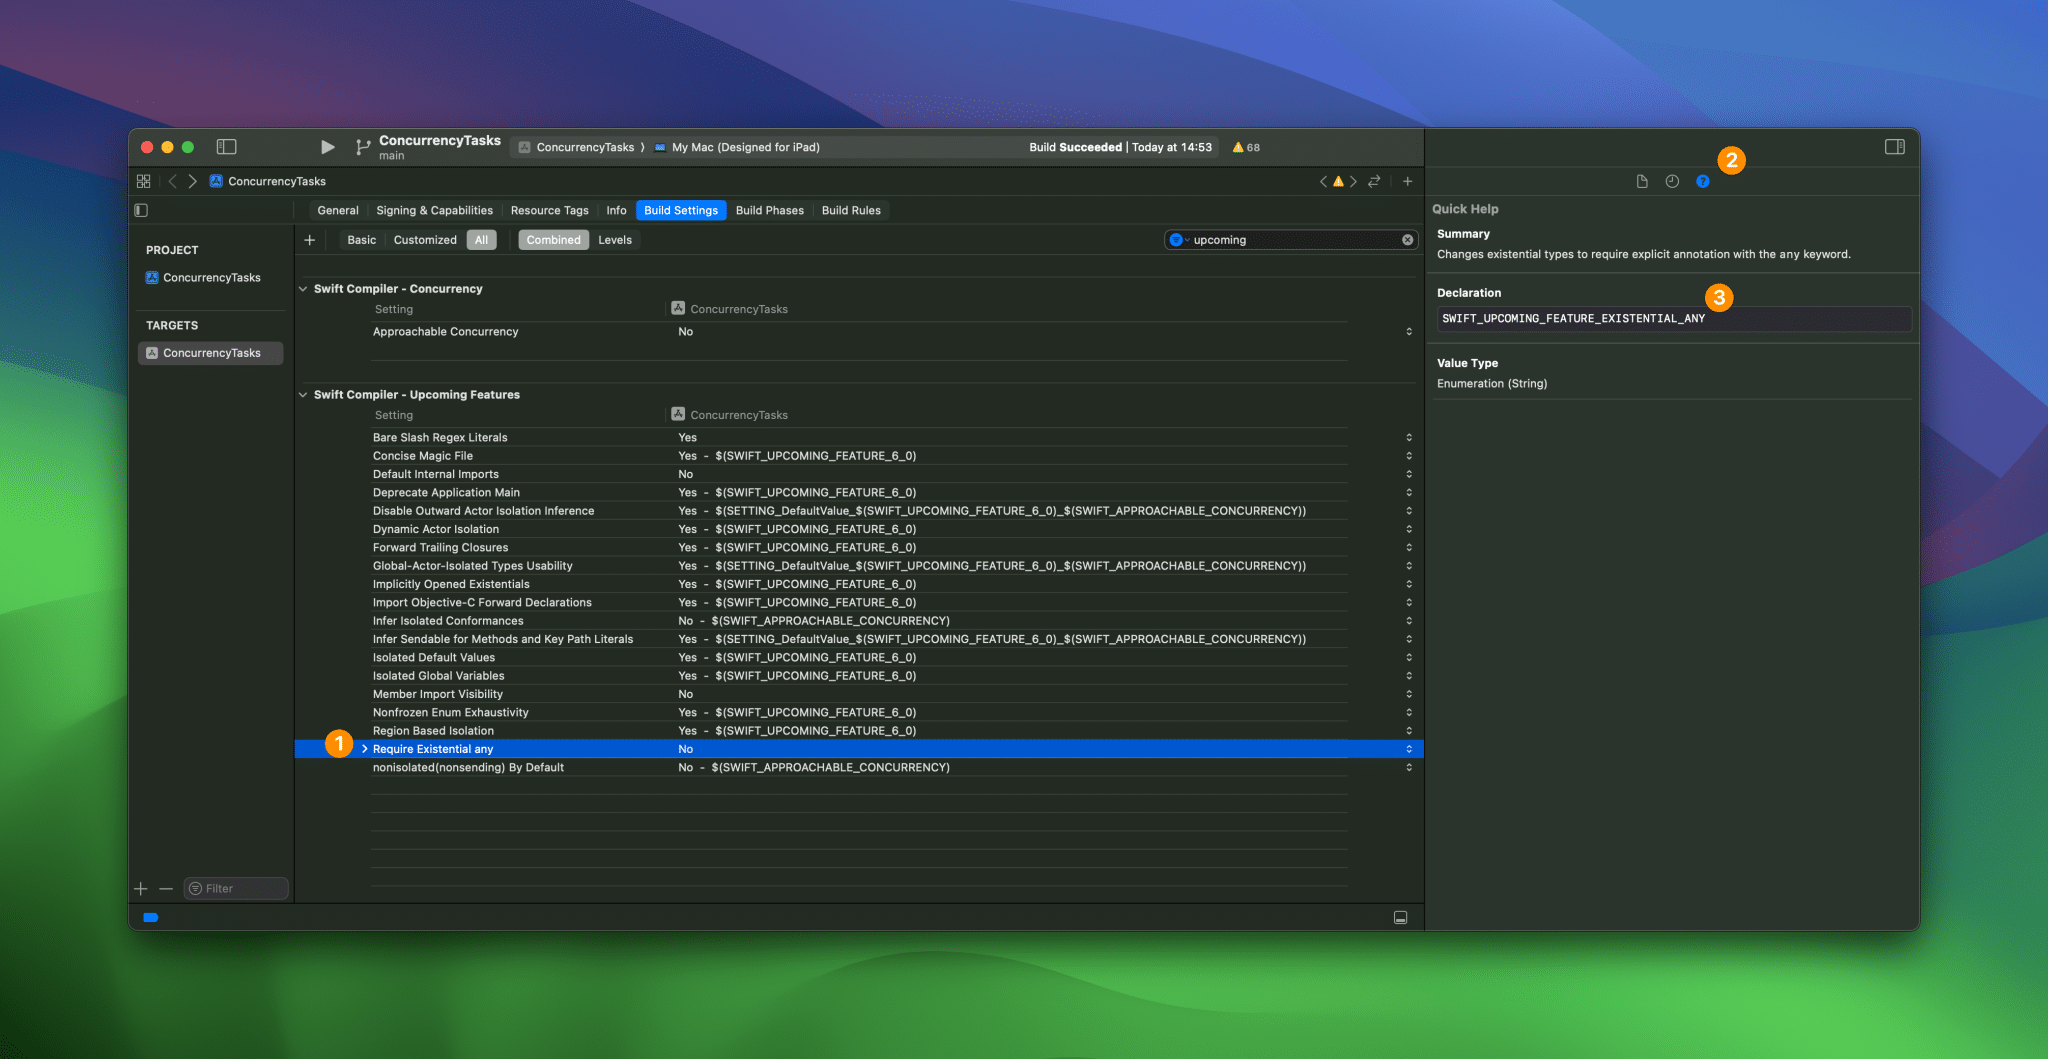
However, it is helpful to read through the related proposal to gain a sense of the associated changes.
9. Change to Swift 6 language mode
After all this is done, it’s time to change the Swift Language Version to Swift 6:
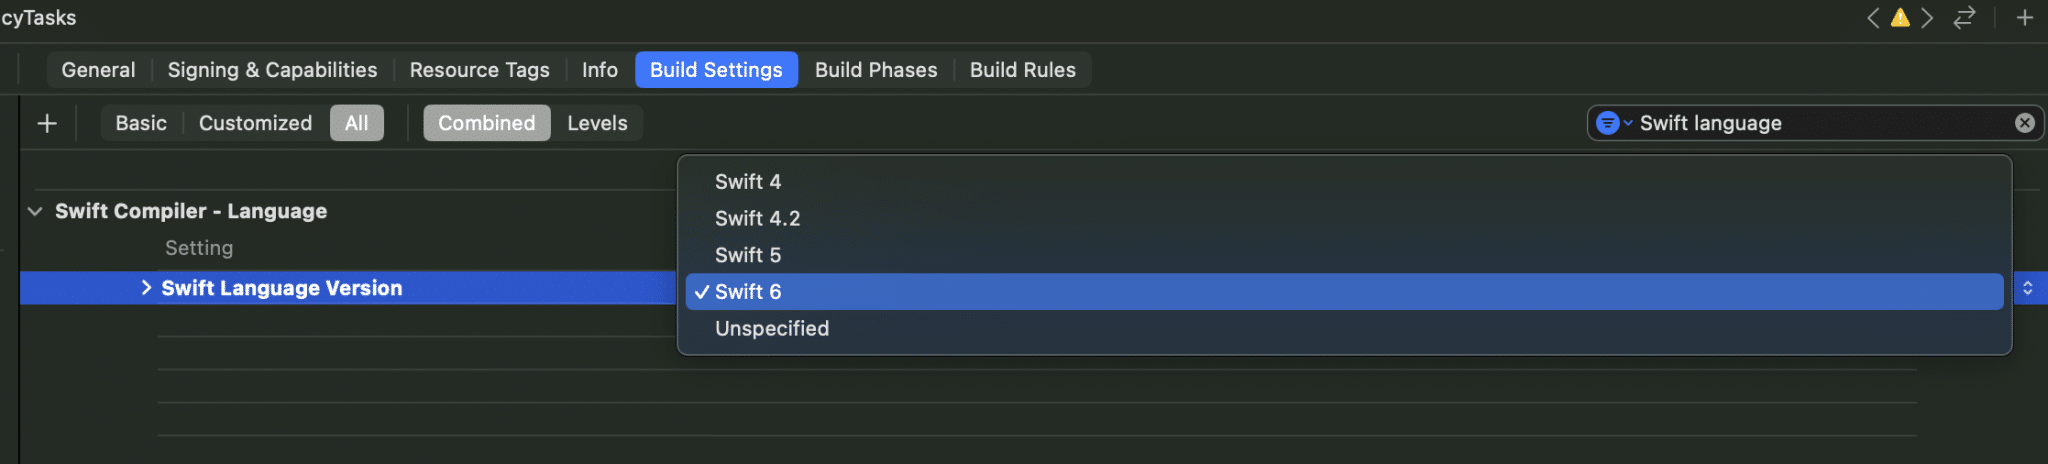
For packages, you can change the Swift tools version:
// swift-tools-version: 6.0
// The swift-tools-version declares the minimum version of Swift required to build this package.

import PackageDescription

let package = Package(...
Ideally, you won’t have any new warnings and errors to fix since you’ve already enabled strict concurrency checking. However, no guarantees!
Summary
And that sums it all up! These steps allow you to gracefully migrate existing code to Swift 6 and Strict Concurrency checking. I recommend following these steps for all parts, packages, projects, and pieces of code you want to migrate and I’m sure this will help you to successfully migrate.